Showing posts with label Quilt Tutorial. Show all posts

Sunday, 27 December 2020

KEEPING DOLLY COZY

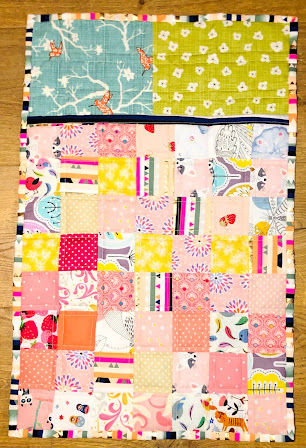
Quilted Sleeping Bag


Quilted Sleeping Bag Tutorial:

1.When your baby sister asks Santa for 'blankets for Dolly' you do what you can to help the big guy out! There are several ways this can be done, this is simply the way I made them and thought you may find it useful if you have small people who also want to keep their Dolly warm.


Cutting:

All squares are 2.5 inches the amount you need will vary depending on the dimensions of the doll you are making for. Dolly is 18 inches tall and is similar to the American Girl type dolls so the below is what I needed to accommodate her size and dimensions.

Front Panel
56 squares for top
Binding (1) 2.5" x 15"
Backing (1) 18" x 16"
Wadding (1) 18" x 16"

Back Panel
77 squares for top
Binding (1) 2.5" x 75"
Backing (1) 24" x 16"
Wadding (1) 24" x 16"


I wanted a scrappy look to mine so I raided my stash and found fabrics I knew the small person would like and would be appropriate for Dolly. You can literally use anything to make these.


Assembly:


1. Sew the squares together using a quarter inch seam, I alternate pressing my seams to the left or right for each row which makes it easier to nest my seams. You can use whichever method you prefer.


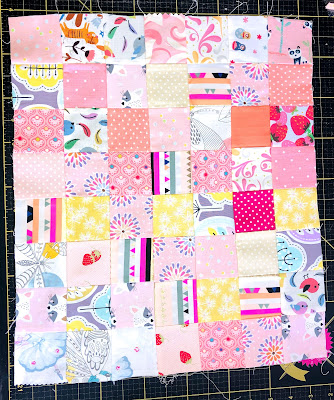
2. If you are using 2.5" squares and making the same size I am, your Front Panel should measure 16" x 14" once the rows (I did 7 rows by 8) have been sewn together. The Back Panel should measure 22" x 14" once the rows (I did 11 rows by 7) have been sewn together.


3. Layer the Front Panel with the wadding and backing and quilt as desired. Repeat for the Back Panel. 
Personally I use pins and NOT glue to baste as it gets stuck in the needle and machine parts - obviously use whichever method you prefer.


I kept my quilting simple by doing straight lines on either side of each seam line, keeping them 1/4 inch apart by using my 1/4 inch foot. There is a mini tutorial on this in my Instagram Guides.


4. Trim down the Front Panel to your desired finished size, for me this was 16" x 14", using the binding strip 2.5" x 15" bind one short edge of this panel leaving 1/2" hanging over each side.


Putting the sleeping bag together:


1. Trim down the Back Panel to your desired size, for me this was 22" x 14" and then place it right side DOWN so your patchwork/top will be against your worksurface. Place the Front Panel right side UP on top of the Back Panel.


2. Match up the bottom corners on both panels and pin in place. 


3. At this stage you can either sew an 1/8" stich line around the whole of the sleeping bag to hold the panels together and then bind as normal OR as I did, pin the panels in place and go straight to binding them together.

Both methods work in the same way, so it makes no difference how you finish off this step, it depends how confident you feel.


Repeat to make as many sleeping bags for Dolly as needed! 

If you need any help working out sizes or number of squares for a different doll, please get in touch and I'll do my best to help you.


Tuesday, 21 July 2020

DISAPPEARING ACT


Disappearing Nine Patch 


Disappearing Nine Patch Tutorial


These blocks work really well if there is a contrast in the colours and fabrics you choose, ideally you want to have light, medium and dark fabrics. It's ok if you don't though as it's perfect for scrap busting.


Cutting:


Square size can vary depending on the size of block and/or finished quilt you want - as long as all squares are the same size it doesn't matter. For the purpose of this tutorial, I used a couple of charm packs so my squares are 5 inches.

Cut 9 squares, each 5" x 5"

  • (1) dark
  • (4) medium
  • (4) light


    Arrange the squares into three rows with three squares in each. Place the dark square in the block's centre position. Place the your feature fabric squares (medium) or those you wish to highlight in the block's four corners. Fill in the gaps with the remaining squares (light).


Assembly:


1. Sew the squares together using a quarter inch seam, I press my seams to the dark side, but you can do whatever you prefer, I also like to nest my seams so they lay flatter and line up perfectly.


2. If you are using 5" squares your block should measure 14" square when once the rows have been sewn together. You're then going to cut this in half vertically, so you have 2 units each measuring 7" x 14"


3. Cut each unit in half horizontally, so you have 4 units each measuring 7" square and then the fun begins.


Putting the block together:


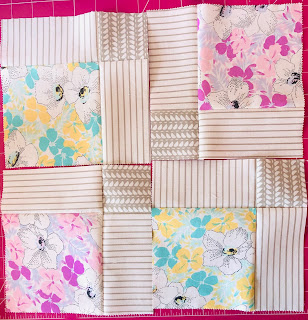
1. There are a variety of different ways these blocks can go together, have fun and experiment to find a layout you like and then sew the rows together.


2. This is the one I went with, the feature fabrics will stand out more due to the borders around them, which is what I was after for this particular block.


Repeat to make as many blocks as you need for your quilt. I intend to have 4 rows of 4 so will need 16 blocks, this will give me a finished quilt of 54" square.

Wednesday, 28 August 2019

X MARKS THE SPOT

Treasure Hunt 


Treasure Hunt Block Tutorial

12.5" finished block
This block is part of the great series by Blossom Hearts Quilts called The Bee Hive there are 12 blocks in the series, all completely free. The template for this block can be found here.


Cutting:
A1 and A4 2 1/4" x 9 1/2" 
A2 and A5 2 1/4" x 7"      
A3 and A6 2 1/4" x 4"

4 of each is needed to make one complete 12.5" block.


Assembly:

This block is put together in 4 units very simply by foundation paper piecing.

I found it easier to write on each section the colour/fabric I wanted to use there, as all quadrants were a different colour. This was so I could get the effect I wanted for my X to repeat making a secondary square design across the intended quilt.


The assembly process is the same for all 4 units.

Unit 1

1. Place one A1 rectangle right side up on the back of the paper template (you will be sewing along the printed lines so need to see these at all times), place one A2 rectangle on top of it so that the right sides, or patterned/coloured sides are facing each other.


2. Turn the template over so the guidelines are now facing you and sew down the line joining A1 to A2.


3. Carry on in this way until all strips have been sewn together.


You will then have a unit that looks like this.


4. Repeat for the remaining 3 units and then trim down any excess so that all units measure 6.5" square.


Putting The Block Together:

1. Place the units into pairs and attached together, then sew the two rows together to form one finished block. Simply remove the paper on completion of sewing.


Finished block will measure 12.5" square which includes a 1/4" seam on each side.


Wednesday, 4 July 2018

UPDATING TUTORIALS

CAPITAL 'T'


Capital T Block Tutorial

18" finished block
All seams are a scant 1/4” unless otherwise noted

Cutting:
Background Fabric
(1) 6 1/2"
(1) 6-7/8" x 13-3/4"
(8) 3-1/2" x 6-1/2" 

Feature Fabric

(1) 6-7/8" x 13-3/4" 
(16)3-1/2"

Assembly:

This block is put together in two simple units: A and B

Unit A

1. Place the two 6 7/8" x 13 3/4" rectangles with right sides together, lightest of the two fabrics on top. Lightly draw a straight line 6 7/8" from the short edge dividing the rectangle in half and forming two squares. Then draw two diagonal lines through the center of the two squares, sew a 1/4" away from the diagonal line on both sides.


2. Cut the rectangles apart on the drawn lines creating four half square triangle components. Press the seams to the lighter fabric. The finished units should measure 6 1/2".


Unit B

1. Lightly mark a line from one corner to the opposite corner on the wrong side of the sixteen 3 1/2" squares of the feature fabric.

2. Take a 3 1/2" feature square and place it, right sides together, on top of one of the 3 1/2" x 6 1/2" background fabric rectangle matching edges and making sure that the diagonal line runs as shown. Sew on the marked line. Repeat with the remaining seven 3 1/2" x 6 1/2" background rectangles and seven more of the 3 1/2" marked squares.

3. Cut 1/4" away from the sewn line as shown. Press the seam toward the focus fabric.


4. Take the remaining eight 3 1/2" feature fabric squares and place them on the units created in Step 3, right sides together, so that the marked diagonal line is as shown. Sew on the line.


5.  Cut 1/4" away from the sewn line as shown. Press the seam toward the feature fabric. One "geese" unit is completed. This unit should measure 3 1/2" x 6 1/2".


Putting The Block Together:

1. Join two of the geese units (B) created together as shown. Press seam away from the point of the geese. Repeat with the remaining six geese units to create a total of four new units. These units should measure 6 1/2" square.


2. Join the top and bottom Block rows by piecing two right triangle squares with one of the geese units as shown. Press seams toward the right triangle squares.


3. Create the middle row of the block by joining the last two geese units with the remaining 6 1/2" background square. Complete the Capital T Block by joining the three rows as shown. 


The complete quilt Block should measure 18 1/2" square which includes a 1/4" seam allowance on all sides.