Showing posts with label Fabric Stash. Show all posts

Sunday, 27 December 2020

KEEPING DOLLY COZY

Quilted Sleeping Bag


Quilted Sleeping Bag Tutorial:

1.When your baby sister asks Santa for 'blankets for Dolly' you do what you can to help the big guy out! There are several ways this can be done, this is simply the way I made them and thought you may find it useful if you have small people who also want to keep their Dolly warm.


Cutting:

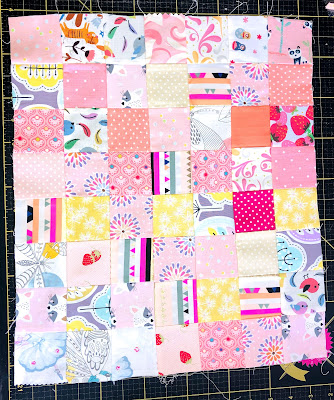
All squares are 2.5 inches the amount you need will vary depending on the dimensions of the doll you are making for. Dolly is 18 inches tall and is similar to the American Girl type dolls so the below is what I needed to accommodate her size and dimensions.

Front Panel
56 squares for top
Binding (1) 2.5" x 15"
Backing (1) 18" x 16"
Wadding (1) 18" x 16"

Back Panel
77 squares for top
Binding (1) 2.5" x 75"
Backing (1) 24" x 16"
Wadding (1) 24" x 16"


I wanted a scrappy look to mine so I raided my stash and found fabrics I knew the small person would like and would be appropriate for Dolly. You can literally use anything to make these.


Assembly:


1. Sew the squares together using a quarter inch seam, I alternate pressing my seams to the left or right for each row which makes it easier to nest my seams. You can use whichever method you prefer.


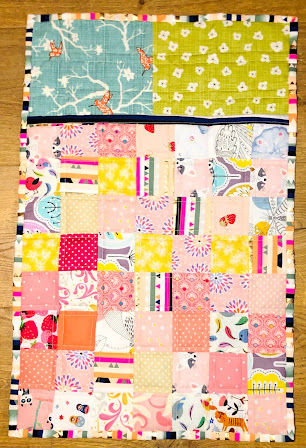
2. If you are using 2.5" squares and making the same size I am, your Front Panel should measure 16" x 14" once the rows (I did 7 rows by 8) have been sewn together. The Back Panel should measure 22" x 14" once the rows (I did 11 rows by 7) have been sewn together.


3. Layer the Front Panel with the wadding and backing and quilt as desired. Repeat for the Back Panel. 
Personally I use pins and NOT glue to baste as it gets stuck in the needle and machine parts - obviously use whichever method you prefer.


I kept my quilting simple by doing straight lines on either side of each seam line, keeping them 1/4 inch apart by using my 1/4 inch foot. There is a mini tutorial on this in my Instagram Guides.


4. Trim down the Front Panel to your desired finished size, for me this was 16" x 14", using the binding strip 2.5" x 15" bind one short edge of this panel leaving 1/2" hanging over each side.


Putting the sleeping bag together:


1. Trim down the Back Panel to your desired size, for me this was 22" x 14" and then place it right side DOWN so your patchwork/top will be against your worksurface. Place the Front Panel right side UP on top of the Back Panel.


2. Match up the bottom corners on both panels and pin in place. 


3. At this stage you can either sew an 1/8" stich line around the whole of the sleeping bag to hold the panels together and then bind as normal OR as I did, pin the panels in place and go straight to binding them together.

Both methods work in the same way, so it makes no difference how you finish off this step, it depends how confident you feel.


Repeat to make as many sleeping bags for Dolly as needed! 

If you need any help working out sizes or number of squares for a different doll, please get in touch and I'll do my best to help you.


Wednesday, 1 April 2020

A MINI ADVENTURE

When I Met Tula! 

I don't think I ever told you about the time I met Tula Pink - major fan girl moment, I was really impressed with myself that I actually managed to get whole sentences out and they even made some sense!


There's always that worry that if you meet an idol or someone you greatly admire, they may not quite live up to expectations etc, but she really did! Tula was so kind and down to earth, she walked around the room before hand, talking to everyone, having a little sit down looking at the projects people had brought along, giving advice and just generally being lovely.


She then went on to give a brilliant lecture on how she started out in this business, what inspires her, her design process and thought process - the whole thing was wonderfully inspiring and a very insightful look at the fabric designing and manufacturing industry.

A couple of people asked questions about a fabrics 'life cycle', why certain fabrics are only made in seemingly small quantities and never reprinted, the responses I found quite fascinating as I've not got a great deal of experience in the manufacturing side of things. It certainly went a long way to explaining why the resale of some of her earlier lines is down right extortionate in some cases - I will add that this is through private sales and not something she can control.


What is the point of all this you are probably wondering? Not much, I simply adore Tula Pink and wanted to share my love of her fabric and creativity before I go on to show you a mini quilt I made for a Tula Swap. I found it rather difficult to cut into my Tula stash, especially knowing it was going to two other homes and not staying with me, but I got there in the end.


The only real request made from my swap partner was for the purple butterfly from the Eden collection to feature somewhere in the mini quilt, so with that as my starting point I set out a Tula colour wheel to see what jumped out at me. I knew I wanted a mix of prints and solids, but had no design in mind and opted for a more experimental approach of building the quilt as I went.


I had settled on some kind of New York Beauty and Flying Geese combo because I just love them and the endless possibilities there are when using the fabulous book, but that was it I didn't follow a specific pattern so they were both totally unique.


I played around with each section as I had only pinned them in place on my design wall - I often do this if I'm experimenting with a quilt design or playing with my own take on an existing pattern, rather than sewing it up and having to unpick it. When I am happy with a section and I know I won't be changing it then I go ahead and stitch it in place. 


I didn't want two totally identical mini quilts, so for the second I added in some fussy cut pattern matching. It was the first time I had tried it with facial features, it's not perfect if you look very closely but I'm happy with it for a first attempt and I can report that my partner who ended up with this one loved it.


There were so many patterns and varying prints to choose from that it did take a while for me to actually set this one in its final background, where I had used solids for most of the outer rings I wanted a striking print, eventually it was the lovely Deity elephant from Eden in Orchid that won. 


I really enjoy making mini quilts and have been in several mini swaps over the years, there is something quite satisfying about being able to make a quilt from start to finish is a day or a weekend depending on design, even if it is a mini one!

Happy Quilting
Kerry xx

Wednesday, 28 August 2019

X MARKS THE SPOT

Treasure Hunt 


Treasure Hunt Block Tutorial

12.5" finished block
This block is part of the great series by Blossom Hearts Quilts called The Bee Hive there are 12 blocks in the series, all completely free. The template for this block can be found here.


Cutting:
A1 and A4 2 1/4" x 9 1/2" 
A2 and A5 2 1/4" x 7"      
A3 and A6 2 1/4" x 4"

4 of each is needed to make one complete 12.5" block.


Assembly:

This block is put together in 4 units very simply by foundation paper piecing.

I found it easier to write on each section the colour/fabric I wanted to use there, as all quadrants were a different colour. This was so I could get the effect I wanted for my X to repeat making a secondary square design across the intended quilt.


The assembly process is the same for all 4 units.

Unit 1

1. Place one A1 rectangle right side up on the back of the paper template (you will be sewing along the printed lines so need to see these at all times), place one A2 rectangle on top of it so that the right sides, or patterned/coloured sides are facing each other.


2. Turn the template over so the guidelines are now facing you and sew down the line joining A1 to A2.


3. Carry on in this way until all strips have been sewn together.


You will then have a unit that looks like this.


4. Repeat for the remaining 3 units and then trim down any excess so that all units measure 6.5" square.


Putting The Block Together:

1. Place the units into pairs and attached together, then sew the two rows together to form one finished block. Simply remove the paper on completion of sewing.


Finished block will measure 12.5" square which includes a 1/4" seam on each side.


Friday, 20 October 2017

MODERN MAN SAMPLER

The Sequel...

Rather embarrassingly I started this quilt almost 2 years ago even though I had a set deadline life and many other things just got in the way and it sat on the side being ignored, you can see the beginning of the journey here but feeling newly motivated and with a new deadline for completion in mind, Modern Man Sampler currently looks like this 


This isn't anything like the final layout as I still have about another 17 blocks of varying sizes from 6" - 18" to go and I am also still in the process of trying to decided what these will be which isn't helping! Any ideas? The only criteria is that they are modern and manly, or traditional that can look manly!

My initial inspiration was London Calling by Quiet Play which I got off Craftsy, I actually have quite a few of her patterns because as regular readers will know I love foundation/paper piecing! The patterns are clearly marked and very easy to follow, a couple of the sections are a little bit fiddly due to the size of the pieces but the outcomes are always fantastic! My latest addition is the proud solider


I love how this turned out! He look so crisp and clean, I was a bit nervous about having so much white, but I think it makes the colors pop really well, although his face blends in a bit in the picture, it is actually Kona Flesh I've used and looks much better in person.

I also had some time yesterday to whip up a few 6" blocks from Don't Call Me Betsy's Epic Sampler I love these blocks so much, they all look good on their own or in groups or just altogether, she really is one of my true inspirations.


I found it a little bit tricky to try and get that Friendship Star to sit flat, you can see that it is still slightly wonky, I am hoping that some crafty pressing will sort it out, otherwise I shall have to rename it Wonky Star!

As well as getting my quilt mojo back in full force we've also been Wedding Fairing our little socks off! There is so much information and so much to take in, it's quite overwhelming! My favorite human has been brilliant, trailing behind carrying brochures, leaflets and business cards and ooooing and aaahhing in all the right places!! My top find of this weekend was a great florist who specializes in making rose gold foliage, as this is one of our main colors I can't tell you how thrilled I was find him, just have a look how gorgeous this is......


I've got a whole morning of quilting tomorrow with my quilt squad, looking forward to a good catch up and having a nose at all the amazing things they have been up to over the last month.

If you've been up to something wonderful you'd like to share, get in touch and I'll put it up. Alternatively if you are offering a fab BOM, Sampler or Pattern and would like to get that out there I'd be happy to help, I have so many people asking about new things to start or to test!

Happy Quilting
Kerry xx


Tuesday, 10 October 2017

STARTS AND FINISHES

An Animal Menagerie 


It feels like an age since I've had the time to sit down and share my thoughts and adventures, not for want of intention simply to much life going on! I've not been idol in fact far from it I seem to have quilts and ideas coming out my ears! 

I finished Grans Fancy Forest and thankfully it went down a treat, although the deliberate errors still really annoy me, Gran didn't mind them.


Not only has it made a great addition to the chair, but the spot has now been taken over for the very important task of story reading and general tomfoolery! 


There were many things I enjoyed about this pattern and some that didn't work so well for me, the pieces for some of the animals are very small and tricky to sew together however they do come together really quickly and the animals are all so different and really effective when put together. You can read the full story here if you missed it.

Clearly I'm a sucker for animals and a glutton for punishment because I just can't get enough of these Elizabeth Hartman patterns. My current adventure is the charming Lloyd and Lola


I started a couple of weeks ago making their faces, I find it easier to make all the same sections in one go rather than completing 1 animal at time before starting the other one, 


They were the smallest parts and the fiddliest, they also took the longest to put together but after that the bodies sprang up in a jiffy, I actually got both done in 1 afternoon when Tom was out and still managed to do 2 loads of washing and make diner. Totally got this wife in training stuff nailed!


Last but not least the legs went on and then the 'fun part' of quilting commenced. I've only just got that completed this week as we had our amazing 2 week holiday and then our engagement party and all the planning and carry on that goes with it, hence my slight delay in getting a new post up!


This is a bit of a secret project so there are parts of it that I can't reveal just yet but so far they are coming together nicely and the quilting has worked really well, I tried to be brave and go for the whole quilt approach a very basic diagonal line but still out of my comfort zone! Do you have a preference to design when whole quilting? Do you even do that? Let me know your preferred quilting method, I am always looking for new things to try out.


Speaking of new things...... these are a few I have got my eye on and am currently working out fabrics/ideas for


A mix of designs and ideas and totally different from what I would normally be drawn to, but I've always loved the idea of sampler quilts and those with a mix and match feel to them. I've never worked in these kinds of colors either so that in itself will be challenging!

If you've taken on any new challenges lately or would like to join me on mine I'd love to hear from you! Get in touch and lets make it happen!

Happy Quilting
Kerry xx

Wednesday, 16 August 2017

FESTIVAL 2017

A Brilliant Day Out.....


Did you go to Festival? This year was my 6th year! It's better than Christmas I swear it, I've started saving for next year already. We had the usual cohort of myself, Kerry Q and Aunty Gail but also the added bonus of Carrie...a festival virgin if you can believe it! We set off (not so) bright and early at our usual time of 6:30am arriving just before 9 for breakfast and a planning session of where to go and when.

Our first stop is always Alice Caroline for the £1 a piece Liberty bins, but I have to say this year despite leap frogging of a sea of grannies to get to the front of the table, we left empty handed! A first in 6 years! There just wasn't the variety or the quality this year, most of them were very dull colors and none of the traditional 'Liberty' prints that we love so much, a very disappointing start!

That's not to say we didn't shop til we dropped!


The top photo are just some pretty bits I couldn't leave behind when I visited Purple Stitches (the second time!) the second are some with a tribal vibe that I am going be mixing in with my Travelling Quilt Bee blocks. If you missed the first installment of that adventure, you can find it here.


Next up an array of bright and bold Kona Solids sourced from the wonderfully helpful and exceptionally patient ladies at Simply Solids, teamed with a handful of fat quarters I picked up at The Cotton Patch from a variety of designers including Kaffe Fasset and Tula Pink. They are going to be used for a custom order I have had for something fit for an Indian Princess, who will be celebrating 70 years of wonderful life! I've got a couple of ideas but can't wait to get started on this one!

The second photo is a selection of fat quarters I bought simply because I loved the cool and calming mint and grey combo as they sat there calling to me in the boxes. I added the right hand side collection to them as I was walking around because I thought they complimented it well. I didn't have an original plan or use for them to start with, they just called my name! However I stock piled my good old favorites Kona Snow and Shadow and am now thinking that these will be used for my version of Summer Sampler 2017.


Of course it wouldn't be a successful festival trip if I didn't add to my collection of "One days", so above is my haul. You may have spied the brilliant new book by Stuart Hillard,it is fab there are so many gorgeous blocks in there that can be used literally in 100 quilts. He could not have been nicer to meet, we spent several minutes talking weddings, as he very recently tied the knot and just look at this little love note I got.....


There so many beautiful quilts on display, I always feel very inspired when I go to festival, I took as many picture as I could of the ones that spoke to me, enjoy!


There were a couple of real howlers as well some of which were judges choices, I know everyone has a difference in opinion of what makes something good and I really can appreciate all the work that goes in to making these quilts, but I did have several "Really??" moments. Makes me hopeful for one day when I am feeling brave enough to enter something into one of these shows!

Let me know what you thought if you went along, I always love to hear from my quilty pals!

Happy Quilting 
Kerry xx