Showing posts with label Tula Pink. Show all posts

Tuesday, 23 February 2021

SHOW YOUR STRIPES BLOG HOP

 Stripy String Quilt


A little while ago Carla from Creatin in the Sticks put a call out to those of us that love stripes - any size any way, striped fabric, striped binding, strips of fabric to make stripes (here's where I come in) literally anything goes! 

There are so many fantastic bloggers taking part over the week(schedule at the bottom) and a whole host of different projects, ideas and inspirations that you can read about and try out - I hope you will join in and show me your stripes!


If you have read by blog for a while or follow me on Instagram you will know how much I love scraps and using them for scrap quilts, you will also know how much I love Tula Pink and that every single tiny piece gets saved 'just in case' and that curating fabric pulls for quilts is one of my favourite things!! So when the opportunity came up to do all of this together plus add in my favourite technique of foundation paper piecing - I squealed out loud!!

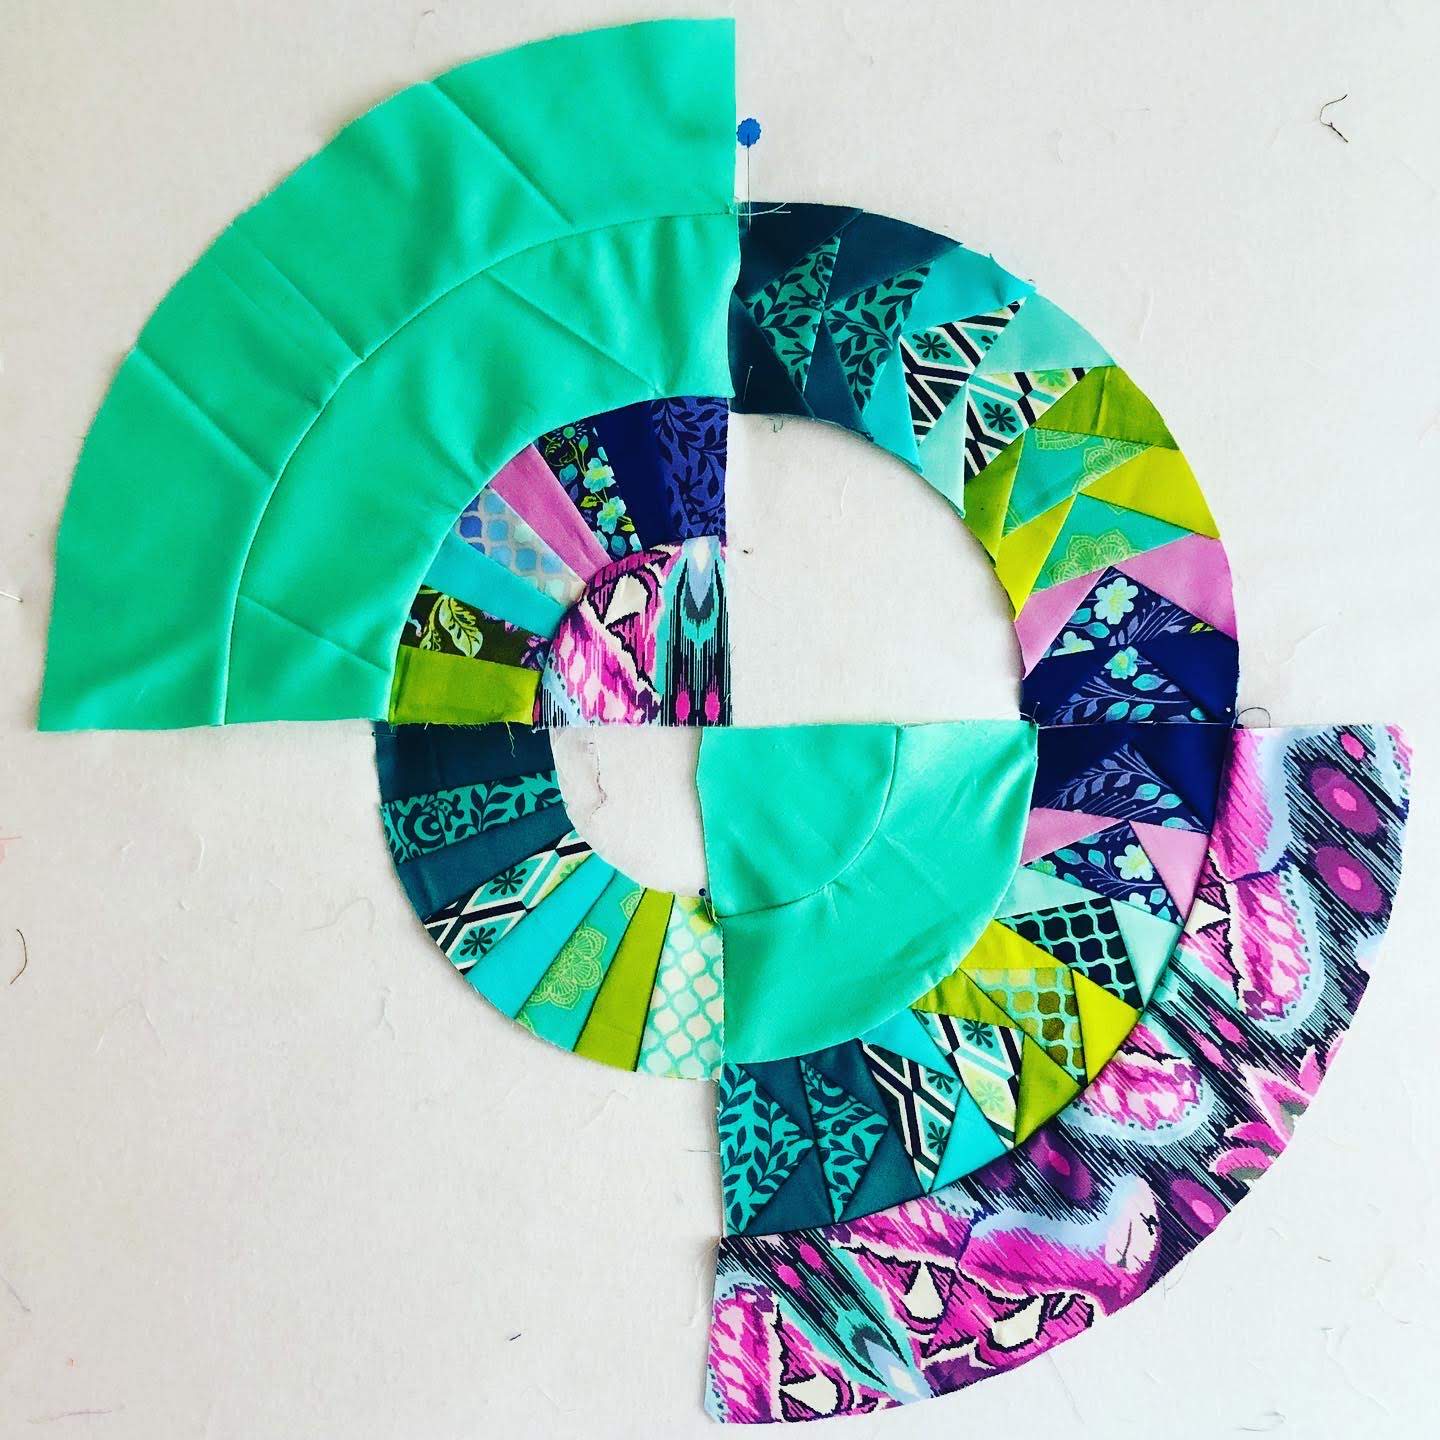
Above is a quarter section of a String Quilt block measuring 7.5 inch square, this is what we will be making together using the Foundation Paper Piecing (FPP) method. FPP is a popular technique in patchwork for making quilts, done by sewing fabric to a printed paper foundation, although we will be doing something simple together the possibilities are endless and there are some absolutely amazing FPP patterns available.

There are many free templates available, but for ease you can download the template I made here if you want to make your own in a different size it's super easy - decide on the size of your block and draw it out, add 1/4 inch seam allowance all the way around and then draw in your sections. 

** Please note you will need FOUR of these to make ONE whole block **


Step 1 Preparation

Decide on your fabrics and cut your strips. I cut mine 1.5 inches wide but you can have skinny stripes, fatter stripes or a mix of all of them. The length will vary depending on which stripe you're sewing so my advice is make sure they are at least as long as the longest section on the template and then trim accordingly after sewing!

You will be tearing the paper out at the end which can cause stress on your seams, for this reason I usually reduce my stitch length and make it shorter, either to 1.8 or 2 - it's not essential just personal preference. 

You my also find it helpful to trim down the template (whichever you are using) to slightly bigger than the seam allowance, as it can be a bit of a fiddle trying to manoeuvre the paper and fabric at times.


Step 2 Sewing the first stripe

For these blocks I always start in the middle with the longest stripe and then sew everything on one side i.e. the left and then everything on the other side. As these templates aren't specifically numbered there is not 'right' way to do it, it's simply personal preference.

Starting with the longest section down the middle, place your chosen fabric stripe right side (patterned side) up over the whole section, it should extend 1/4 inch over the lines as this is creating seam allowance.  Place your second fabric stripe directly on top of it right side down. You can put a pin in it to keep it secure if you wish, then flip it over so the fabric is underneath and your paper template is on top.


Sew directly on that line from one end to the other and then finger press your fabric open.


Step 3 Complete the block

Place your next piece of fabric right side down, lining up the edge with stripe 2, on top of the template as shown below. Flip and stitch down the line as before.


Continue in this way until all stripes have been sewn, you will end up with something that looks quite odd due to the excess fabric. 


Step 4 Trimming the quarter blocks


With the paper template side up, trim down your block to the seam allowance line - DO NOT cut off the seam allowance!

I find it easiest to use the 1/4 inch line on my ruler and match this up with the lines around my template and block as shown below.


Trim off all the excess fabric on all sides until your block is square - if you're using my template it should measure 7.5 inches square.


Step 5 Trimming the quarter blocks

When all four quarters are pieced and trimmed, they can start to be assembled to make full blocks and this is where the fun begins!

Depending on where you have placed your fabrics and how you lay the sections/blocks out will change the over all look of the quilt.

Below are a few of these options.


You will start to see secondary patterns emerging when you lay multiple blocks out together, these can be highlighted with a bit more careful planning, depending on your fabrics choices.


I really hope you've enjoyed sewing along with me, if you make a block or 4 or more please let me know and share them with me, I love to see your creations. 

You can see all the other bloggers in this fantastic blog hop below


Show Your Stripes Blog Hop Schedule:

Wednesday, 9 December 2020

IT'S THE MOST WONDERFUL TIME OF THE YEAR!

Especially when you get Great Presents!

It's no secret I have an addiction to fabric - so this is always a sure win when buying a present for me, but as a quilter I quite often get asked what 'good presents' to buy are. So I thought I'd put together a little list of things that have caught my eye recently or that I generally can't do with out in case anyone was struggling with what to buy for the quilter/sewer/crafter in their life.

This is not sponsored or affiliated in any way, simply my opinions on things I like, thing I use regularly and things I would recommend to others.


1. Wonder Clips/Clover Clips/Quilt Clips

I'll be honest I was quite late to the party with these and had been quilting for around 6 years before I actually bought some of these to see what the fuss was about - game changer! I honestly don't know why I didn't see sense sooner, they really are a 'wonder' when binding and make the job so much easier. You can pick them up from just about anywhere.


2. Wool Pressing Mat

This was one of my new purchases this year, I love it and it's permanently set up in my sewing room. They come in a variety of sizes so you can get whichever would suit your needs - my advice would be to get the biggest one you can accommodate on your work table! Far easier and much less cumbersome than having to set up the ironing board all the time. Again these can be purchased from several places, but I got mine here.


3. 1/4 Inch Quilting Foot with Guide

This is an absolute God send and one of the very first things I treated myself to when I first started patchwork and quilting 'properly' - most brands of sewing machine have them but they are brand/machine specific. You will need to know the exact sewing machine the person you're buying for has, to make sure it'll fit the machine and work properly.

4. A Block of the Month Program

There are so many out there, it can be really tough deciding which one to go for so my advice is think about what you want to gain from it - do you want to learn or try something new or do you want to expand a certain set of skills? Then have a look what is out there that'll help you achieve that goal. I've looked at so many at one point they all blurred together but for next year I've decided on The Pattern Club by Quiet Play.


5. Replacement Rotary Cutter Blades

Never underestimate the power of a new blade! They really can make all the difference when a project requires lots of cutting, or even just replacing it if you've had the same one on for a little while - you'd be surprised how quickly they can become blunt. You will need to make sure the blades you buy are the correct size for the Rotary Cutter you've got/the person you're buying for has but you will find that they are widely available from a variety of places.


6. Seam Ripper and Stiletto Combo

The discovery of this is one of my favourite things to come out of 2020, I was able to shop small and support a local craftsman by purchasing this fantastic little device - they come in all manner of colours and designs all hand crafted and just beautiful! One side is a seam ripper, the other is a stiletto perfect for feeding tricking points and sample pieces through the sewing machine, both tuck neatly away to avoid any stabbing of fingers when not in use. Pencole Pens and Turnings is the place to go for one of these beauties.


7. Fabric Gift Vouchers

As I said I'm a fabric addict - you can never have enough and buying it is a totally separate hobby to actually using it! Pretty much everywhere does vouchers of some kind but some of may favourite smaller places to support are the following because I've always had excellent above and beyond customer service, super fast shipping and just general loveliness!

- Cow and Giraffe
- Olive and Flo Handcraft
- The Crafty Mastermind
- The Fabric Fox
- The Purple Stitches
- The Eternal Maker


So there you have it, a little guide of happy shopping for the Crafty person in your life. 

If you've got any recommendations for things you can't craft without I'd love to hear about them you can get in touch in the usual ways.

Happy Quilting
Kerry xx

Wednesday, 1 April 2020

A MINI ADVENTURE

When I Met Tula! 

I don't think I ever told you about the time I met Tula Pink - major fan girl moment, I was really impressed with myself that I actually managed to get whole sentences out and they even made some sense!


There's always that worry that if you meet an idol or someone you greatly admire, they may not quite live up to expectations etc, but she really did! Tula was so kind and down to earth, she walked around the room before hand, talking to everyone, having a little sit down looking at the projects people had brought along, giving advice and just generally being lovely.


She then went on to give a brilliant lecture on how she started out in this business, what inspires her, her design process and thought process - the whole thing was wonderfully inspiring and a very insightful look at the fabric designing and manufacturing industry.

A couple of people asked questions about a fabrics 'life cycle', why certain fabrics are only made in seemingly small quantities and never reprinted, the responses I found quite fascinating as I've not got a great deal of experience in the manufacturing side of things. It certainly went a long way to explaining why the resale of some of her earlier lines is down right extortionate in some cases - I will add that this is through private sales and not something she can control.


What is the point of all this you are probably wondering? Not much, I simply adore Tula Pink and wanted to share my love of her fabric and creativity before I go on to show you a mini quilt I made for a Tula Swap. I found it rather difficult to cut into my Tula stash, especially knowing it was going to two other homes and not staying with me, but I got there in the end.


The only real request made from my swap partner was for the purple butterfly from the Eden collection to feature somewhere in the mini quilt, so with that as my starting point I set out a Tula colour wheel to see what jumped out at me. I knew I wanted a mix of prints and solids, but had no design in mind and opted for a more experimental approach of building the quilt as I went.


I had settled on some kind of New York Beauty and Flying Geese combo because I just love them and the endless possibilities there are when using the fabulous book, but that was it I didn't follow a specific pattern so they were both totally unique.


I played around with each section as I had only pinned them in place on my design wall - I often do this if I'm experimenting with a quilt design or playing with my own take on an existing pattern, rather than sewing it up and having to unpick it. When I am happy with a section and I know I won't be changing it then I go ahead and stitch it in place. 


I didn't want two totally identical mini quilts, so for the second I added in some fussy cut pattern matching. It was the first time I had tried it with facial features, it's not perfect if you look very closely but I'm happy with it for a first attempt and I can report that my partner who ended up with this one loved it.


There were so many patterns and varying prints to choose from that it did take a while for me to actually set this one in its final background, where I had used solids for most of the outer rings I wanted a striking print, eventually it was the lovely Deity elephant from Eden in Orchid that won. 


I really enjoy making mini quilts and have been in several mini swaps over the years, there is something quite satisfying about being able to make a quilt from start to finish is a day or a weekend depending on design, even if it is a mini one!

Happy Quilting
Kerry xx

Monday, 23 March 2020

WHY DO YOU QUILT?

A Question Often Asked


I've had this post rattling around in my head for a while, something has always stopped me writing it, I'm not sure what really but now in the midst of 'isewlation' due to this horrid Coronavirus outbreak it seems like a good time to finally get it out. For those of you that have read the dreaded 'C' word and immediately got put off - it is the only time it appears here.


What on earth are you doing? What's the point in cutting up perfectly good pieces of fabric into smaller pieces and sewing it back together? Why do you even want to do that?

Honest questions that I get asked all the time, mostly on holiday or on the train when I am desperately trying to grow my EPP project that should have been finished in May 2019:


Questions that are usually followed by 'oooh I just wouldn't have the patience'. Historically quilting was far more utilitarian born out of a need to keep warm at night but with little resource and scare supplies, so any small piece of fabric that could be used, was added to another until larger pieces were made and then turned into quilts. Nowadays though for a lot of people, this isn't the case, blankets can be bought in all forms and fabric is available in abundance - so why do we quilt?

I've long been of the opinion that buying fabric and making anything out of it, in my case quilts, are two entirely separate hobbies, unfortunately my poor husband is still very much in denial about this - the fabric collecting is something I will have to tackle in another post, #tulapink is all I can say!

I thoroughly enjoy the whole process of selecting a quilt block or pattern based on who I'm making it for or why I'm making it, choosing fabrics and colours that bring the quilt to life and then there is the making process - watching as each little section gets bigger and starts to take shape, eventually becoming a completed quilt top.


I've made all sorts of quilts from lap size to king size, machine pieced, paper pieced (my fav!), group quilts, baby quilts, wedding quilts and everything in between. I'm also lucky enough to have made several custom quilts and commissions, something I am very proud of and continue to do.

There are lots of creative things I could do though, so why do I make quilts? It's simple really - to combat loneliness, by somehow feeling connected to like minded and other fabric loving people like me.

I moved to the UK when I was 13 years old, I left my friends, my culture, the sunshine and everything I'd ever known on the other side of the world in South Africa, a severe shock to the system is an understatement. I started school in September 1998 in Year 9 - another severe shock to the system, where I'm from it's quite common to go to Nursery then move to Primary School and then to Secondary School without the people in your class, however when I moved here I learnt that more often than not everyone goes to the same Nursery then to the same Primary School etc so by the time I joined in Year 9 at the age of 13, many had already been together for a very long time. 

It wasn't that people were necessarily unfriendly but it was very apparent that they already had their friends and on top of that I was different, I spoke funny, I didn't know about the popular things or have the right sized waistline or celebrity crushes - PJ and Duncan could have been a takeaway place for all I knew, so it was both a daunting and lonely time.


My best friend lives on the other side of the world, she always has, thankfully we're both able to travel (as I am writing this draft I'm sitting in the glorious sunshine in her beautiful garden) and use WhatsApp, Facebook etc now but it's not the same, she's my person and I miss her everyday. We speak all the time but it is still very lonely, I've always felt lonely so I guess I was looking for something that would help me notice her absence a little less. 

I've long believed that any form of craft or doing something that makes you happy, is great for ones well-being and mental health and I think that this is even more important in today's society where so many people have forgotten how to simply be kind to each other.

I started my quilting journey by doing a beginners class where I met some fantastic ladies, a few of us went on to do a slightly more advanced course where we met a couple more and the five of us are still firm friends, meeting once a month for our own stitch and bitch. We even have our own mini retreats where we rent a beautiful cottage somewhere in the country - usually in the vicinity of at least one quilting shop and have a 'sew in' for four days, we've had three so far, this year marks our 8th as a completely mad bunch of quilting friends, we were a group of six but sadly we lost our friend Sue a few years ago.

These wonderful women who I am very proud to call my friends are so inspirational, I've learnt so much from them and continue to do so, they are supportive and encouraging and I honestly wouldn't be half the quilter I am today if it hadn't been for them.


Image result for why we quilt


So why do I quilt?

Because it feeds my soul, I love creating, I love learning and I enjoy spending time with like minded people, who despite what life might throw up enjoy making beautiful things to reflect their joy and colour. There are so many great books out there dedicated to why people quilt, looking at all aspects across many histories and I have read many of them, but most recently Thomas Knauer released Why We Quilt and I honestly couldn't put it down - cover to cover it is fantastic, the images are beautiful and each story is so wonderfully unique that each person who reads this book will relate to something in it.

So that's my story, that's why I love to quilt, if you'd like to share your story please do get in touch. You can see all my quilting adventures in pictorial from on Instagram @thatssewkerry 

Happy Quilting
Kerry xx 

Sunday, 24 June 2018

A PLACE FOR EVERYTHING

Everything In Its Place

I'm quite late to the party with this one as it seems to have been all the rage circa 2016, but you know me I'm not very good at following trends!
When I first saw these popping up on Instagram I loved the idea of them but thought that's going to take an absolute age to make and mine won't end up looking like that. Now I know nobody likes a know-it-all but I was right, it was very time consuming and not a quick make but this was partly down to the modifications I made which meant mine did not end up looking like many of the others I'd seen!


I actually finished it quite a few weeks ago but I am only just getting round to telling you about it - I know I've been quiet for far to long, life's just got in the way of everything at the moment. Wedding planning is not for wimps #truth and it's also not the best idea to buy a new house at the same time, unless it has got as many bedrooms as ours does that can be filled with fabric! 

Although just blogging about it now I've been using my Everything In Its Place/A Place For Everything Bag for a little while, so at least now I can tell you about it and give it a little review as I go.


Firstly don't be put off by all the zips and pockets they make the bag extremely versatile and so functional especially if you travel quite a lot, want to be able to take your sewing with you on the go or just have it altogether while you're watching Netflix.

Secondly the bag appears to have 2 names 'Everything In Its Place Bag' or 'A Place For Everything' if you buy the pattern from By Annie. Annie Unrein offers the pattern as part of her class Sew Sturdy Travel Organisers on Craftsy and I can not recommend it enough, if you are able to splurge on the class you definitely should, I bought it especially for the A Place For Everything Bag but it does have a rather useful looking hanging cosmetics bag as well.


I mentioned already that I stalked Instagram a lot before I even attempted to make my version, particularly Misha Makes whose feed is super inspiring and her photos (above) are great to follow when making this bag. I've got to thank the lovely Hannah who very kindly talked me through her photos to get my modifications spot on and I'd also recommend having a good read of this post by Bloomin' Workshop

The Everything In Its Place Bag has become my EPP bag - it was always my intended purpose for it as I'm embarking on a massive, really special EPP project (stay tuned for more on this) but you can use it for whatever you like. In mine are all my EPP supplies and everything I need for a spot of Fussy Cutting.


The bag is made up of removable 'pages', both the pattern and the class show you how to make 2 pages and most examples out there follow this, I have 3 in mine because it suited my needs and as they are attached using Velcro you can add or remove them as you wish. The pattern includes various options and sizes of the pockets to pick and choose from, so it's worth spending some time planning what you want to use your bag for in order to determine what pocket configuration will suit your needs.


This is the layout and combination that worked best for me but the possibilities are endless, as you can see I went totally off script adding a 3rd page with major modifications pocket wise - I added another smaller mesh pocket with a zip and added a bigger vinyl pocket on the top half of the other side, specifically to keep acrylic templates in, some of which are quite large. 

Other modifications I made were to cover all my zips, add a base fabric under the Velcro to hide all the stitch lines and raw edges and to add a fabric panel to the 'top' page to neaten it off and make it pretty. I also had a go at adding a fabric string to hold my big spools of thread on - I used the smallest poppers I could find to keep it attached but they are still to big to fit through the middle of the thread so these will need looking at again.


I've been quiet but not idol over the several months that I've been MIA so I have got lots to tell you about in the pipeline that will hopefully make blogging a more regular part of my weekly routine! 
If you have made or are planning to make your own Place For Everything Bag get in touch and share your ideas - I could always be tempted to make another one.......

Happy Quilting
Kerry xx