Showing posts with label Sewing. Show all posts

Tuesday, 23 February 2021

SHOW YOUR STRIPES BLOG HOP

 Stripy String Quilt


A little while ago Carla from Creatin in the Sticks put a call out to those of us that love stripes - any size any way, striped fabric, striped binding, strips of fabric to make stripes (here's where I come in) literally anything goes! 

There are so many fantastic bloggers taking part over the week(schedule at the bottom) and a whole host of different projects, ideas and inspirations that you can read about and try out - I hope you will join in and show me your stripes!


If you have read by blog for a while or follow me on Instagram you will know how much I love scraps and using them for scrap quilts, you will also know how much I love Tula Pink and that every single tiny piece gets saved 'just in case' and that curating fabric pulls for quilts is one of my favourite things!! So when the opportunity came up to do all of this together plus add in my favourite technique of foundation paper piecing - I squealed out loud!!

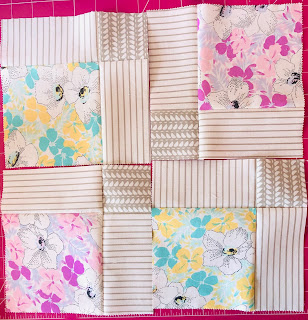
Above is a quarter section of a String Quilt block measuring 7.5 inch square, this is what we will be making together using the Foundation Paper Piecing (FPP) method. FPP is a popular technique in patchwork for making quilts, done by sewing fabric to a printed paper foundation, although we will be doing something simple together the possibilities are endless and there are some absolutely amazing FPP patterns available.

There are many free templates available, but for ease you can download the template I made here if you want to make your own in a different size it's super easy - decide on the size of your block and draw it out, add 1/4 inch seam allowance all the way around and then draw in your sections. 

** Please note you will need FOUR of these to make ONE whole block **


Step 1 Preparation

Decide on your fabrics and cut your strips. I cut mine 1.5 inches wide but you can have skinny stripes, fatter stripes or a mix of all of them. The length will vary depending on which stripe you're sewing so my advice is make sure they are at least as long as the longest section on the template and then trim accordingly after sewing!

You will be tearing the paper out at the end which can cause stress on your seams, for this reason I usually reduce my stitch length and make it shorter, either to 1.8 or 2 - it's not essential just personal preference. 

You my also find it helpful to trim down the template (whichever you are using) to slightly bigger than the seam allowance, as it can be a bit of a fiddle trying to manoeuvre the paper and fabric at times.


Step 2 Sewing the first stripe

For these blocks I always start in the middle with the longest stripe and then sew everything on one side i.e. the left and then everything on the other side. As these templates aren't specifically numbered there is not 'right' way to do it, it's simply personal preference.

Starting with the longest section down the middle, place your chosen fabric stripe right side (patterned side) up over the whole section, it should extend 1/4 inch over the lines as this is creating seam allowance.  Place your second fabric stripe directly on top of it right side down. You can put a pin in it to keep it secure if you wish, then flip it over so the fabric is underneath and your paper template is on top.


Sew directly on that line from one end to the other and then finger press your fabric open.


Step 3 Complete the block

Place your next piece of fabric right side down, lining up the edge with stripe 2, on top of the template as shown below. Flip and stitch down the line as before.


Continue in this way until all stripes have been sewn, you will end up with something that looks quite odd due to the excess fabric. 


Step 4 Trimming the quarter blocks


With the paper template side up, trim down your block to the seam allowance line - DO NOT cut off the seam allowance!

I find it easiest to use the 1/4 inch line on my ruler and match this up with the lines around my template and block as shown below.


Trim off all the excess fabric on all sides until your block is square - if you're using my template it should measure 7.5 inches square.


Step 5 Trimming the quarter blocks

When all four quarters are pieced and trimmed, they can start to be assembled to make full blocks and this is where the fun begins!

Depending on where you have placed your fabrics and how you lay the sections/blocks out will change the over all look of the quilt.

Below are a few of these options.


You will start to see secondary patterns emerging when you lay multiple blocks out together, these can be highlighted with a bit more careful planning, depending on your fabrics choices.


I really hope you've enjoyed sewing along with me, if you make a block or 4 or more please let me know and share them with me, I love to see your creations. 

You can see all the other bloggers in this fantastic blog hop below


Show Your Stripes Blog Hop Schedule:

Tuesday, 21 July 2020

DISAPPEARING ACT


Disappearing Nine Patch 


Disappearing Nine Patch Tutorial


These blocks work really well if there is a contrast in the colours and fabrics you choose, ideally you want to have light, medium and dark fabrics. It's ok if you don't though as it's perfect for scrap busting.


Cutting:


Square size can vary depending on the size of block and/or finished quilt you want - as long as all squares are the same size it doesn't matter. For the purpose of this tutorial, I used a couple of charm packs so my squares are 5 inches.

Cut 9 squares, each 5" x 5"

  • (1) dark
  • (4) medium
  • (4) light


    Arrange the squares into three rows with three squares in each. Place the dark square in the block's centre position. Place the your feature fabric squares (medium) or those you wish to highlight in the block's four corners. Fill in the gaps with the remaining squares (light).


Assembly:


1. Sew the squares together using a quarter inch seam, I press my seams to the dark side, but you can do whatever you prefer, I also like to nest my seams so they lay flatter and line up perfectly.


2. If you are using 5" squares your block should measure 14" square when once the rows have been sewn together. You're then going to cut this in half vertically, so you have 2 units each measuring 7" x 14"


3. Cut each unit in half horizontally, so you have 4 units each measuring 7" square and then the fun begins.


Putting the block together:


1. There are a variety of different ways these blocks can go together, have fun and experiment to find a layout you like and then sew the rows together.


2. This is the one I went with, the feature fabrics will stand out more due to the borders around them, which is what I was after for this particular block.


Repeat to make as many blocks as you need for your quilt. I intend to have 4 rows of 4 so will need 16 blocks, this will give me a finished quilt of 54" square.

Wednesday, 4 July 2018

UPDATING TUTORIALS

CAPITAL 'T'


Capital T Block Tutorial

18" finished block
All seams are a scant 1/4” unless otherwise noted

Cutting:
Background Fabric
(1) 6 1/2"
(1) 6-7/8" x 13-3/4"
(8) 3-1/2" x 6-1/2" 

Feature Fabric

(1) 6-7/8" x 13-3/4" 
(16)3-1/2"

Assembly:

This block is put together in two simple units: A and B

Unit A

1. Place the two 6 7/8" x 13 3/4" rectangles with right sides together, lightest of the two fabrics on top. Lightly draw a straight line 6 7/8" from the short edge dividing the rectangle in half and forming two squares. Then draw two diagonal lines through the center of the two squares, sew a 1/4" away from the diagonal line on both sides.


2. Cut the rectangles apart on the drawn lines creating four half square triangle components. Press the seams to the lighter fabric. The finished units should measure 6 1/2".


Unit B

1. Lightly mark a line from one corner to the opposite corner on the wrong side of the sixteen 3 1/2" squares of the feature fabric.

2. Take a 3 1/2" feature square and place it, right sides together, on top of one of the 3 1/2" x 6 1/2" background fabric rectangle matching edges and making sure that the diagonal line runs as shown. Sew on the marked line. Repeat with the remaining seven 3 1/2" x 6 1/2" background rectangles and seven more of the 3 1/2" marked squares.

3. Cut 1/4" away from the sewn line as shown. Press the seam toward the focus fabric.


4. Take the remaining eight 3 1/2" feature fabric squares and place them on the units created in Step 3, right sides together, so that the marked diagonal line is as shown. Sew on the line.


5.  Cut 1/4" away from the sewn line as shown. Press the seam toward the feature fabric. One "geese" unit is completed. This unit should measure 3 1/2" x 6 1/2".


Putting The Block Together:

1. Join two of the geese units (B) created together as shown. Press seam away from the point of the geese. Repeat with the remaining six geese units to create a total of four new units. These units should measure 6 1/2" square.


2. Join the top and bottom Block rows by piecing two right triangle squares with one of the geese units as shown. Press seams toward the right triangle squares.


3. Create the middle row of the block by joining the last two geese units with the remaining 6 1/2" background square. Complete the Capital T Block by joining the three rows as shown. 


The complete quilt Block should measure 18 1/2" square which includes a 1/4" seam allowance on all sides.

Tuesday, 1 August 2017

A NEW ADVENTURE....

It's Been A While!


"Not all who wonder are lost", has always been one of my favorite quotes, sometimes life takes you to unexpected places and you have to just go with the flow, it's an adventure, be brave and take the leap! So I did, I took the leap I made some big changes to my life and had to focus my attentions on getting things done. I started studying full time again, whilst having a full time grown up job, running two households (with the help of my favorite), dealing with ups and downs, family dramas, new arrivals and some unexpected losses. 
You would think that with all this going on I didn't have time to buy fabric, sew, quilt or make pretty things? WRONG! You know me, I will always find away haha! I really had my confidence knocked and haven't felt in the right place to write about it, but I've not been idol and have got some great things to share with you!

Firstly Kerry Q did in fact say 'I DO!' and it was such a brilliant day.....


She looked absolutely beautiful, the weather was glorious and the Gin was flowing! What more can you ask for on a Friday in September?

My Favorite and I have had some grand adventures over the last year, in Ireland, Blackpool (never again!), Los Angeles, Vegas, Hastings and in a few more sleeps Boston! you'll be very pleased to hear that all of them have been littered with fabric and quilt shop stops!


There have also been a few new additions to the mix, as if I need any excuses to make more quits! Just look at those little faces, so so cute!


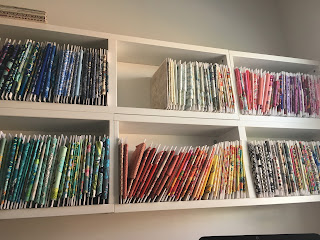
I'm feeling very lucky as I sit and write this from my new studio space, he did a fab job of putting up my shelves, it's a bit bigger than my previous one and in an entirely different county! The view is slightly different and there is a great deal to explore but it's been an epic adventure so far and there's plenty more to come!


It won't be so long until my next post, I promise, as I said I have been super busy making and creating so keep an eye out!

Happy Quilting
Kerry xx


Sunday, 27 March 2016

A JOURNEYS END

Signed, Sealed, Delivered


Almost a year ago I started out on an epic journey, the journey of my first commission!!(whhaaatt?? someone wants me to make them a quilt, for money??) I was rather apprehensive as up until now I had only ever made things that I wanted to, blocks or patterns that appealed to me in colours and fabrics that called to me. Most of them end up as presents for other people, but still if you're going to spend hours on something its got to spark your interest right?
Suddenly to be faced with a very specific criteria put me in a flat spin, it wasn't a style I would naturally be drawn to, nor was the colour palette something I had worked in before but you know me, I love a good challenge!! You can read about the start of my African Adventure here.

Having made a sprinting start with lots of ideas and creativity flowing it got to around August/September time and I totally stalled, it was so sunny and bright, love was blooming (swoon Mr Keeble) and I just had no motivation to sit in doors sewing bits of fabric in brown and muted shades together. The more I knew I had to do it and was running out of time, the less I seemed able to motivate myself to do. I got a bit tangled up with it all, tried out a few experimental blocks that really really didn't work, so with my motivation and now my confidence totally down the pan I stopped altogether. I had a month off where I didn't even look at it, and then started doing lots of research into all the other projects I had seen being done by the wonderful people I follow on Instagram (you can find me on there as thatssewkerry) and that 1 month suddenly became 3 months - more on that later. Now it's January and I've got less than 7 weeks to get this monster done and dusted....panic mode!! 

Having spent a huge amount of time researching all sorts of blocks, designs, quilts you name it really over the last few months I went back through it all and found this particular block called 'Capital T'. 


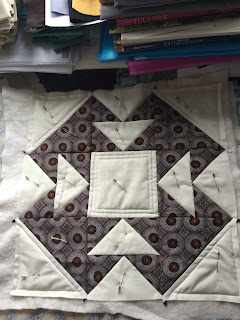
Originally 6" I scaled it up to be the 18" I needed and set to work finishing off the African Star. You can find out how I made this block by having a look at my new Tutorials button at the top of the home page or by clicking here


Originally I made 4 of these blocks, 1 cream, 1 tan and 2 red with the intention of having them alternating along the bottom row, rather irritatingly 4 turned out to be to wide and would have resulted in me having to cut them in a funny position in order to get them to fit and as such the repeat pattern would have been lost, but of course 3 wasn't wide enough to complete the row ggrrrrrr!!! So back to the old faithful 2.5" strips to fill up the extra space, not a total loss as it reflects the top row where a similar totally planned design feature had happened!! 


Due to the size of these blocks there were several large areas of empty space so I tried to be more adventurous with my quilting, mostly just echoing the shapes being quilted such as squares and triangles but still and adventurous step for me. 


One of my New years quilting resolutions was/is to be braver when quilting my blocks and to try to add in more quilting opportunities to the blocks or quilts I am choosing to make. It's a baby step I'll grant you but I'm proud all the same.

The next stage is slightly less exciting but with all the blocks now done they had to be joined together, I opted for my old favourite quilt-as-you-go method, although I do now have the machine space and the table space to attempt whole quilting projects it's still not something I feel brave enough to attempt. Plus I really like the idea of working on smaller bits and then suddenly having a huge quilt to put together, there's a real sense of achievement in that somewhere for me - usually mixed in with a whole lot of madness.


Blocks become rows and then rows become quilts, soon there after there is a flourish of furious hand stitching to get all the back bindings attached and all those raw edges covered, all the while a lot of swearing and stabbed fingers is going on - I've never been able to get on with a thimble! Finally arriving at that very satisfying moment when that last stitch goes in and months and months of work turn into this......


Thank you to everyone who has offered me there thoughts, opinions, ideas and just general support throughout this epic adventure, it really means very much to me and I don't think I would have believed in myself enough to get it done without you all. Lets start the next one......

Happy Quilting
Kerry xx