Sunday 27 December 2020

KEEPING DOLLY COZY

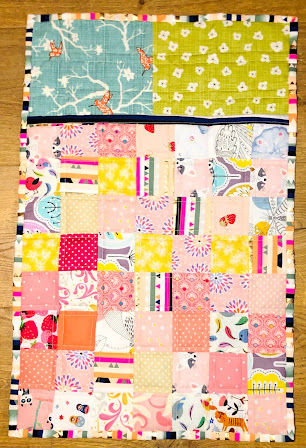
Quilted Sleeping Bag


Quilted Sleeping Bag Tutorial:

1.When your baby sister asks Santa for 'blankets for Dolly' you do what you can to help the big guy out! There are several ways this can be done, this is simply the way I made them and thought you may find it useful if you have small people who also want to keep their Dolly warm.


Cutting:

All squares are 2.5 inches the amount you need will vary depending on the dimensions of the doll you are making for. Dolly is 18 inches tall and is similar to the American Girl type dolls so the below is what I needed to accommodate her size and dimensions.

Front Panel
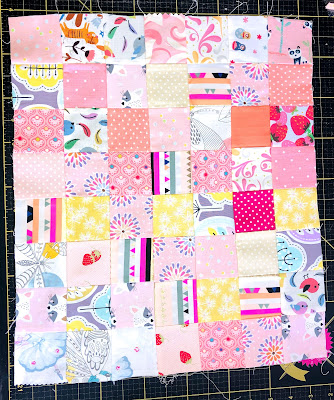
56 squares for top
Binding (1) 2.5" x 15"
Backing (1) 18" x 16"
Wadding (1) 18" x 16"

Back Panel
77 squares for top
Binding (1) 2.5" x 75"
Backing (1) 24" x 16"
Wadding (1) 24" x 16"


I wanted a scrappy look to mine so I raided my stash and found fabrics I knew the small person would like and would be appropriate for Dolly. You can literally use anything to make these.


Assembly:


1. Sew the squares together using a quarter inch seam, I alternate pressing my seams to the left or right for each row which makes it easier to nest my seams. You can use whichever method you prefer.


2. If you are using 2.5" squares and making the same size I am, your Front Panel should measure 16" x 14" once the rows (I did 7 rows by 8) have been sewn together. The Back Panel should measure 22" x 14" once the rows (I did 11 rows by 7) have been sewn together.


3. Layer the Front Panel with the wadding and backing and quilt as desired. Repeat for the Back Panel. 
Personally I use pins and NOT glue to baste as it gets stuck in the needle and machine parts - obviously use whichever method you prefer.


I kept my quilting simple by doing straight lines on either side of each seam line, keeping them 1/4 inch apart by using my 1/4 inch foot. There is a mini tutorial on this in my Instagram Guides.


4. Trim down the Front Panel to your desired finished size, for me this was 16" x 14", using the binding strip 2.5" x 15" bind one short edge of this panel leaving 1/2" hanging over each side.


Putting the sleeping bag together:


1. Trim down the Back Panel to your desired size, for me this was 22" x 14" and then place it right side DOWN so your patchwork/top will be against your worksurface. Place the Front Panel right side UP on top of the Back Panel.


2. Match up the bottom corners on both panels and pin in place. 


3. At this stage you can either sew an 1/8" stich line around the whole of the sleeping bag to hold the panels together and then bind as normal OR as I did, pin the panels in place and go straight to binding them together.

Both methods work in the same way, so it makes no difference how you finish off this step, it depends how confident you feel.


Repeat to make as many sleeping bags for Dolly as needed! 

If you need any help working out sizes or number of squares for a different doll, please get in touch and I'll do my best to help you.


Wednesday 9 December 2020

IT'S THE MOST WONDERFUL TIME OF THE YEAR!

Especially when you get Great Presents!

It's no secret I have an addiction to fabric - so this is always a sure win when buying a present for me, but as a quilter I quite often get asked what 'good presents' to buy are. So I thought I'd put together a little list of things that have caught my eye recently or that I generally can't do with out in case anyone was struggling with what to buy for the quilter/sewer/crafter in their life.

This is not sponsored or affiliated in any way, simply my opinions on things I like, thing I use regularly and things I would recommend to others.


1. Wonder Clips/Clover Clips/Quilt Clips

I'll be honest I was quite late to the party with these and had been quilting for around 6 years before I actually bought some of these to see what the fuss was about - game changer! I honestly don't know why I didn't see sense sooner, they really are a 'wonder' when binding and make the job so much easier. You can pick them up from just about anywhere.


2. Wool Pressing Mat

This was one of my new purchases this year, I love it and it's permanently set up in my sewing room. They come in a variety of sizes so you can get whichever would suit your needs - my advice would be to get the biggest one you can accommodate on your work table! Far easier and much less cumbersome than having to set up the ironing board all the time. Again these can be purchased from several places, but I got mine here.


3. 1/4 Inch Quilting Foot with Guide

This is an absolute God send and one of the very first things I treated myself to when I first started patchwork and quilting 'properly' - most brands of sewing machine have them but they are brand/machine specific. You will need to know the exact sewing machine the person you're buying for has, to make sure it'll fit the machine and work properly.

4. A Block of the Month Program

There are so many out there, it can be really tough deciding which one to go for so my advice is think about what you want to gain from it - do you want to learn or try something new or do you want to expand a certain set of skills? Then have a look what is out there that'll help you achieve that goal. I've looked at so many at one point they all blurred together but for next year I've decided on The Pattern Club by Quiet Play.


5. Replacement Rotary Cutter Blades

Never underestimate the power of a new blade! They really can make all the difference when a project requires lots of cutting, or even just replacing it if you've had the same one on for a little while - you'd be surprised how quickly they can become blunt. You will need to make sure the blades you buy are the correct size for the Rotary Cutter you've got/the person you're buying for has but you will find that they are widely available from a variety of places.


6. Seam Ripper and Stiletto Combo

The discovery of this is one of my favourite things to come out of 2020, I was able to shop small and support a local craftsman by purchasing this fantastic little device - they come in all manner of colours and designs all hand crafted and just beautiful! One side is a seam ripper, the other is a stiletto perfect for feeding tricking points and sample pieces through the sewing machine, both tuck neatly away to avoid any stabbing of fingers when not in use. Pencole Pens and Turnings is the place to go for one of these beauties.


7. Fabric Gift Vouchers

As I said I'm a fabric addict - you can never have enough and buying it is a totally separate hobby to actually using it! Pretty much everywhere does vouchers of some kind but some of may favourite smaller places to support are the following because I've always had excellent above and beyond customer service, super fast shipping and just general loveliness!

- Cow and Giraffe
- Olive and Flo Handcraft
- The Crafty Mastermind
- The Fabric Fox
- The Purple Stitches
- The Eternal Maker


So there you have it, a little guide of happy shopping for the Crafty person in your life. 

If you've got any recommendations for things you can't craft without I'd love to hear about them you can get in touch in the usual ways.

Happy Quilting
Kerry xx

Tuesday 21 July 2020

DISAPPEARING ACT


Disappearing Nine Patch 


Disappearing Nine Patch Tutorial


These blocks work really well if there is a contrast in the colours and fabrics you choose, ideally you want to have light, medium and dark fabrics. It's ok if you don't though as it's perfect for scrap busting.


Cutting:


Square size can vary depending on the size of block and/or finished quilt you want - as long as all squares are the same size it doesn't matter. For the purpose of this tutorial, I used a couple of charm packs so my squares are 5 inches.

Cut 9 squares, each 5" x 5"

  • (1) dark
  • (4) medium
  • (4) light


    Arrange the squares into three rows with three squares in each. Place the dark square in the block's centre position. Place the your feature fabric squares (medium) or those you wish to highlight in the block's four corners. Fill in the gaps with the remaining squares (light).


Assembly:


1. Sew the squares together using a quarter inch seam, I press my seams to the dark side, but you can do whatever you prefer, I also like to nest my seams so they lay flatter and line up perfectly.


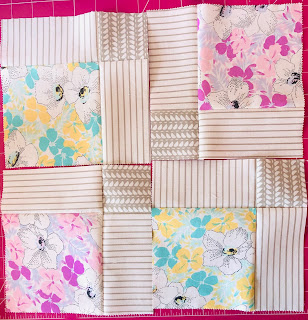
2. If you are using 5" squares your block should measure 14" square when once the rows have been sewn together. You're then going to cut this in half vertically, so you have 2 units each measuring 7" x 14"


3. Cut each unit in half horizontally, so you have 4 units each measuring 7" square and then the fun begins.


Putting the block together:


1. There are a variety of different ways these blocks can go together, have fun and experiment to find a layout you like and then sew the rows together.


2. This is the one I went with, the feature fabrics will stand out more due to the borders around them, which is what I was after for this particular block.


Repeat to make as many blocks as you need for your quilt. I intend to have 4 rows of 4 so will need 16 blocks, this will give me a finished quilt of 54" square.

Friday 10 July 2020

SO I DID A THING.......

I bought a Longarm machine

Often, when you least expect it, life throws you a curve ball. Something you weren't expecting happens and you don't really know what to do, this happened to me at the beginning of the year when I was forced out of a job I loved because of poor leadership and lack of support, but as the saying goes when one door closes another one opens!

I have longingly looked at longarm quilting machines for quite sometime, but they are big so where would I put it and they are expensive so it isn't a decision to make lightly. At the end of February my wonderful husband and I took a trip to view a few and try them out - I was already sold to be honest but it never hurts to carry out more research.

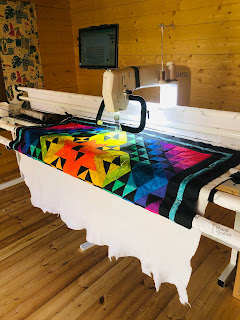
Then the dreaded Corona happen shortly after so things took a little longer than I had hoped but in the middle of May this happened...


She is absolutely amazing, even better than I was expecting, slightly daunting and so much to learn but equally exciting. I spent a few days practicing and was really pleased with my first attempts at free motion quilting on a longarm machine.


It wasn't long before I couldn't resist stitching out edge to edge designs using Pro-Stitcher, the results were really satisfying.


With new found confidence I loaded my first full quilt on to Maggie (that's what we've called her) and stitched out an all over clover design, I absolutely loved it and the overall result is great.


 I haven't looked back since and have quilted several more quilts - I am definitely addicted! 


I'm so excited about this adventure and where it is going to take me, if you need me you know where I'll be - in The She Shed practicing and playing with my longarm.


Happy Quilting
Kerry x

Wednesday 1 April 2020

A MINI ADVENTURE

When I Met Tula! 

I don't think I ever told you about the time I met Tula Pink - major fan girl moment, I was really impressed with myself that I actually managed to get whole sentences out and they even made some sense!


There's always that worry that if you meet an idol or someone you greatly admire, they may not quite live up to expectations etc, but she really did! Tula was so kind and down to earth, she walked around the room before hand, talking to everyone, having a little sit down looking at the projects people had brought along, giving advice and just generally being lovely.


She then went on to give a brilliant lecture on how she started out in this business, what inspires her, her design process and thought process - the whole thing was wonderfully inspiring and a very insightful look at the fabric designing and manufacturing industry.

A couple of people asked questions about a fabrics 'life cycle', why certain fabrics are only made in seemingly small quantities and never reprinted, the responses I found quite fascinating as I've not got a great deal of experience in the manufacturing side of things. It certainly went a long way to explaining why the resale of some of her earlier lines is down right extortionate in some cases - I will add that this is through private sales and not something she can control.


What is the point of all this you are probably wondering? Not much, I simply adore Tula Pink and wanted to share my love of her fabric and creativity before I go on to show you a mini quilt I made for a Tula Swap. I found it rather difficult to cut into my Tula stash, especially knowing it was going to two other homes and not staying with me, but I got there in the end.


The only real request made from my swap partner was for the purple butterfly from the Eden collection to feature somewhere in the mini quilt, so with that as my starting point I set out a Tula colour wheel to see what jumped out at me. I knew I wanted a mix of prints and solids, but had no design in mind and opted for a more experimental approach of building the quilt as I went.


I had settled on some kind of New York Beauty and Flying Geese combo because I just love them and the endless possibilities there are when using the fabulous book, but that was it I didn't follow a specific pattern so they were both totally unique.


I played around with each section as I had only pinned them in place on my design wall - I often do this if I'm experimenting with a quilt design or playing with my own take on an existing pattern, rather than sewing it up and having to unpick it. When I am happy with a section and I know I won't be changing it then I go ahead and stitch it in place. 


I didn't want two totally identical mini quilts, so for the second I added in some fussy cut pattern matching. It was the first time I had tried it with facial features, it's not perfect if you look very closely but I'm happy with it for a first attempt and I can report that my partner who ended up with this one loved it.


There were so many patterns and varying prints to choose from that it did take a while for me to actually set this one in its final background, where I had used solids for most of the outer rings I wanted a striking print, eventually it was the lovely Deity elephant from Eden in Orchid that won. 


I really enjoy making mini quilts and have been in several mini swaps over the years, there is something quite satisfying about being able to make a quilt from start to finish is a day or a weekend depending on design, even if it is a mini one!

Happy Quilting
Kerry xx